

Imagine yourself sitting in front of your desk, surrounded by multiple devices such as your desktop, laptop, and media player. You try to switch from one device to another, but you get irked by the endless plugging and unplugging of your keyboard, mouse, and monitor.
That’s where the KVM switch comes in handy.
With a KVM switch, you can seamlessly control and switch between devices without the trouble of having to manually unplug your peripherals and plug them into a different device. In this article, we’ll talk about the fundamentals of this device and how it enables you to connect various devices to a single monitor.
What is a KVM Switch?
A Keyboard, Video, Mouse (KVM) switch, similar to an HDMI switch, is a device that allows you to connect multiple input devices to a single output display. However, as the name suggests, you can also connect your keyboard and mouse to this device and be able to use it across all your input devices.
Overall, a KVM switch provides a simpler way for you to use the same display, keyboard, and mouse across multiple computers.

What are some benefits of using a KVM Switch over a standard HDMI Switch?
While these two devices mainly share the same function, there are cases where using a KVM switch can be greatly beneficial for you. Here are some benefits you could get from using it.
-
Clean and organized workspace
By using a USB KVM switch, you reduce cable clutter on your desk, providing for a cleaner and tidier workspace that’s easier to maintain.
-
Streamlined workflow
With seamless device switching, this type of switch helps you save time and eliminate all unnecessary interruptions, allowing for a more efficient workflow.
-
Enhanced multitasking
By using the same monitor, keyboard, and mouse across multiple devices, it becomes much easier for you to switch from one device to another. With it, you can jump from one device to another with a single click of a button and be able to work on multiple tasks at the same time.
For the next part of this discussion, let’s briefly discuss how easy it is to set up this device.
To begin, prepare your input devices and output display, as well as your keyboard and mouse. Make sure you place all your devices on your desk properly for maximum convenience. Also, you should know that using external storage devices, such as flash drives, is also possible on your switch. Should you decide to do this, that storage device will be accessible to all your input devices.
Let’s proceed to the actual setting up of your device.
- Connect all your input media devices and your output display to your KVM Switch’s designated ports.
- Connect your shared USB devices, such as your mouse and keyboard’s bluetooth adapter or a thumb storage device.
- Power up all your input and output devices.
- Connect your KVM switch to a power source. Use your device’s dedicated power adapter to prevent any issues.
Your switch should start working, and your monitor will be displaying the content in just a few seconds. If not, try checking if all input devices are plugged in properly or check for any damages in your cable.
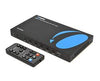
To switch from one input device to another, there’s usually a toggle button on either your device or its remote controller that will allow you to do this.
See how easy that was? If you’re all set and ready to get one for your own, you may want to consider these things first.
Here are some factors that you should consider when getting a switch.
- Number of input devices: When planning your new setup, consider how many ports you need so you can get a switch that can easily cater to it.
- Output resolution: Do you own a 4K monitor? Then make sure that the switch you’ll be getting can also support this. Otherwise, your UHD monitor will only be able to display the best resolution that your switch can support.
- Type of input ports: Do you need a USB-C KVM? Or will you only be plugging in HDMI and USB cables? Whichever you decide, make sure that the device you’re getting can support the different cable types that you’re planning to use.
In the end, all KVM switches will definitely do you good, but the best HDMI switch for you will highly depend on your needs and requirements.
To jumpstart your product research, here’s one that can surely fit into most types of setups.
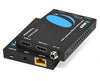
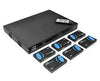
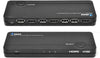
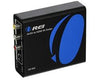
The OREI UKM-301C is a 3-port (3-in, 1-out) HDMI KVM switch that supports USB-C, USB-A, and HDMI connections. It features a pass-through feature for your USB-C devices so it charges while it’s connected to your switch. The UKM-301C supports 4K UHD Media Content at 60Hz Refresh Rate, as well as audio standards including Dolby TrueHD, PCM, and DTS-HD Master Audio.
The device is also USB 3.1 compliant. In terms of its supported media sources, it virtually covers all HDMI devices including laptops, gaming systems, smartphones, tablets, and media players.
The UKM-301C supports up to 3 input devices, including 1 USB-C device, and outputs it to 1 display device. It includes 2 shared USB ports where you can plug-in your keyboard, mouse, storage devices, and more.
To learn more about the OREI UKM-301C, feel free to click here. Once you’re in our shop, you can find more information about the product, such as technical specifications, sample applications, customer reviews, and FAQs. The UKM-301C is covered with 1-year warranty and lifetime technical support. You may also purchase this device through Amazon.
Did you like what you read? Learn more about KVM switches and other HDMI devices in our blog!
